Before I start, I would like to welcome everyone reading this post. It is the first post on my new website, and I can’t say how much I appreciate you taking the time to read it.
Lately, I have been doing some compositing work on a feature-length film. I can’t reveal a lot of details about the film itself or show any material from it because it has not been released yet.
But I wanted to share some lessons I learned from this project in the hope that it might help someone who, like me, is trying to learn and improve their skills as a VFX artist.
I have one DISCLAIMER, though. The techniques I will share in this post, and on the website in general, might not be new to someone who is an experienced VFX artist. In fact, some of these techniques might not be even the best way of achieving the results I am aiming for, or they may even be bad techniques. However, I still would like to share them as part of my learning process. As they say, you can’t learn without making mistakes and, for me, the fastest way to learn is to share these mistakes so people with more experience than me can point them out.
The point I am trying to make is you have to take everything I share here with a grain of salt and test things for yourself.
With that out of the way, let’s go.
The project
As I said, the project was a feature-length film. I worked on two shots that required planar tracking, cleanup, some simple rotoscoping, and grain matching. One of the shots required some morphing.
The main challenge for both shots was the planar tracking. There were no tracking markers used on-set, the item that needed to be tracked was coming and going out of shot, and there were other elements moving that made it slightly difficult to get a clean automatic track, even after rotoing the moving elements out.
So, I had to do the tracking manually.
Tracking
I went through manually tracking my first shot multiple times. No matter how hard I tried and how accurate I thought I am with my keyframes, the result was unsatisfactory to me. There was always some sliding and some warping from one keyframe to the next.
I was going crazy and getting a bit frustrated.
Then I started analysing what was happening, in an attempt to figure out the solution. Eventually, I realised that the main problem I am having was that my eye was deceiving me. With all of the things that are moving and changing in the shot, I would think that I am placing my keyframes accurately, but in reality I wasn’t.
That was my first breakthrough.
First solution
Initially, I thought that the best thing to do is to break the tracking task into multiple stages, each of them achieving a specific goal. So, using a mix of PointTrackers and PlanarTrackers, I went over the shot tracking, then stabilising, and then tracking the stabilised result of the previous tracker.
This is what the process looked like in the node graph:
Then, once I am done with the tracking, I would apply the matchmove to the element, going from back to front. So, I would apply the matchmove from the last tracker first and start going backwards until I get to the very first tracker.
Take note of the parent information on each of the matchmove nodes in the previous picture. You will see that the first one comes from PlanarTracker2, which is the last tracker I have applied in tracking phase. I then use the matchmove from Tracker2, then PlanarTracker1, and finally Tracker1.
Notes on the multi tracker technique
The good thing about this technique is that it breaks down the tracking process into chunks. You don’t need to get it perfect at the initial stage since you can keep improving the tracking until you are satisfied with the result.
However, the main problem with it, is that it can get very confusing very quickly. It also requires a lot of organisation. As you can see from the screenshots, I made sure that each node exported from the trackers had information detailing which tracker it was exported from and what task it achieves, so I don’t get lost. Organisation is really important in compositing, but it is something that a lot of artists tend to overlook. Imagine trying to open a script that uses this technique from an artist that has poor organisational skills 🥴
The second solution
Although I managed to get the first shot done and approved using the mutli tracker technique described above, it was clear that I needed to simplify things. And this is when it hit me.
All I needed was one simple PlanarTracker with some rough keyframes to start the process. Then, using that tracker, I would stabilise the plate and start improving the keyframes looking at the stabilised plate, which would make it less likely for my eyes to deceive me and would improve the quality of the track a lot.
Now this technique is very simple that a lot of experienced compositors are probably now saying: duh.. of course you have to look at the stabilised plate when placing keyframes, you idiot. But, as I said, this wasn’t as obvious to someone who is still realtively new to this.
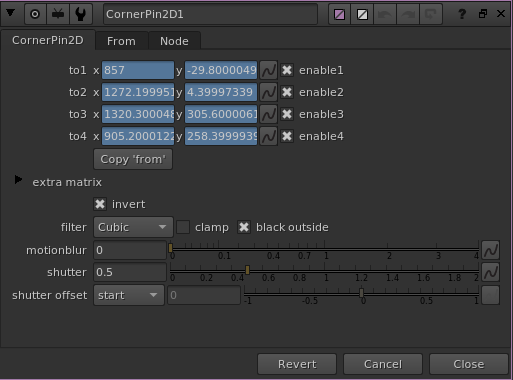
However, what is probably not as obvious about this technique is that it doesn’t actually use the stabilise CornerPin generated from the PlanarTracker.
For those who are not familiar with Nuke, the PlanarTracker can generate 3 different CornerPin nodes. Here is a description on each one of them from the Nuke manual:
– CornerPin2D (relative) – warp the image according to the relative transform between the current frame and the reference frame.
– CornerPin2D (absolute) – set the to positions to the corners of the planar surface, and the from positions to the dimensions of the currently selected node. This option places the incoming image entirely inside the planar surface.
– CornerPin2D (stabilize) – applies the inverse transform of the track to stabilize the image. This option locks down the image so that the tracked plane effectively doesn’t move – can be very useful for applying drift corrections.
Nuke manual, PlanarTracker
Now, I am not going to go into detail about what each one does and when to use them. This is not the point of this post. The main thing to highlight here is that the stabilise CornerPin is the inverse of the matchmove CornerPin.
What the Nuke manual doesn’t say, though, is that the stabilise is the inverse of the relative matchmove not the absolute. This means that the stabilise CornerPin will try to stabilise the planar surface to where it was on the reference frame.
What I wanted is a stabilise based on the absolute matchmove. This way the plane I am tracking would fill the entire frame of the image, so I can judge it better.
So, instead of exporting a CornerPin (stabilise), I exported a CornerPin (absolute) and then inverted it, using the invert checkbox in the node.
Using this technique, my tracking setup became much simpler. Just one tracking node and one stabilisation node.